Sale!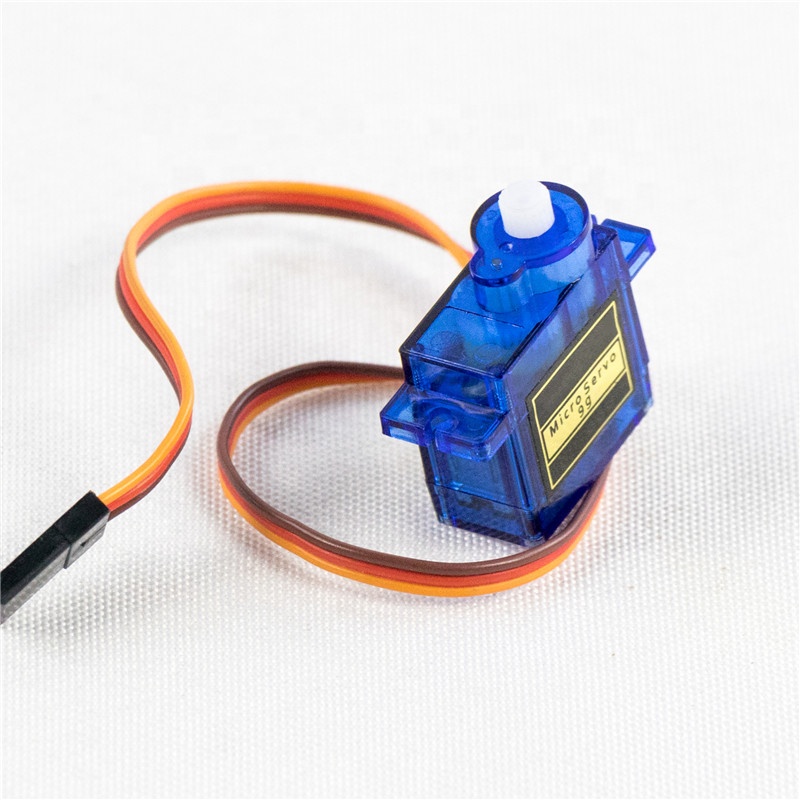
SG90 9G Servo motor BX3 ,R13
$ 95.13
DescriptionActuation is what separates a passive sensor node from an interactive robot. While standard DC motors spin endlessly, a servo motor gives you absolute control over its physical position. The SG90 Micro Servo is the undisputed king of beginner-friendly robotics, providing a simple, low-cost way to translate digital code into precise mechanical movement.Whether you are designing a sweeping ultrasonic radar for an autonomous rover or a locking mechanism for an IoT smart box, this tiny blue motor is the perfect mechanical bridge.How It Works (PWM Control)If you look inside the translucent blue casing in the product image, you will see a tiny DC motor attached to a nylon gearbox, all wired to a smart control circuit. By sending a specific series of digital pulses—known as Pulse Width Modulation (PWM)—to the orange signal wire, you tell that internal circuit exactly what angle to point the white shaft towards.A 1-millisecond pulse turns it all the way to 0°.A 1.5-millisecond pulse centers it at 90°.A 2-millisecond pulse turns it all the way to 180°.Power Constraints (The “Jitter” Warning)While the SG90 is a low-power actuator, it still draws a surge of current the moment it starts moving or encounters resistance.Crucial Design Note: You can often power a single SG90 directly from the 5V pin of an Arduino for quick testing. However, if you are building a robotic arm with three or four servos, you must use an external 5V power supply (like a high-discharge battery pack or a dedicated buck converter). If your servo starts “jittering” randomly or your microcontroller keeps resetting, the motor is starving your logic board of current!Standard 3-Wire InterfaceWiring the SG90 is incredibly straightforward. It features a standard 3-pin female connector:Brown Wire: Ground (GND)Red Wire: Power (VCC, typically 5V)Orange Wire: PWM Signal (Connects directly to a PWM-capable digital pin on your microcontroller)Key Features:Lightweight: Weighing only 9 grams, it is highly favored for drones, RC airplanes, and weight-sensitive telemetry payloads.Plug-and-Play: Supported immediately by almost every standard servo library across Arduino (C ), MicroPython, and Raspberry Pi.Hardware Included: Ships with a standard set of white plastic control horns and mounting screws to easily attach it to your physical project.Technical Specifications:Operating Voltage: 4.8V to 6.0V DCStall Torque: 1.5 kg-cm (at 4.8V)Operating Speed: 0.12 sec / 60 degrees (at 4.8V without load)Rotation Angle: ~180 DegreesDead Band Width: 7 microsecondsGear Material: NylonDimensions: ~22.2mm x 11.8mm x 31mmWeight: 9gIdeal Applications:Steering mechanisms for small RC cars and boatsPan-tilt mounts for cameras and ultrasonic sensors (HC-SR04)Micro robotic arms and hexapod walkersAutomated deadbolts for smart home enclosuresGetting started with the SG909G Servo motorHere we will see how to connect a servo motor and then how to turn it to different positions.Hardware requiredArduino UnoA servo motorJumper wiresConnecting the HardwareCodeThe following code will turn a servo motor to 0 degrees, wait 1 second, then turn it to 90, wait one more second, turn it to 180, and then go back.// Include the Servo library #include <Servo.h> // Declare the Servo pin int servoPin = 3; // Create a servo object Servo Servo1; void setup() { // We need to attach the servo to the used pin number Servo1.attach(servoPin); } void loop(){ // Make servo go to 0 degrees Servo1.write(0); delay(1000); // Make servo go to 90 degrees Servo1.write(90); delay(1000); // Make servo go to 180 degrees Servo1.write(180); delay(1000); }Package includes: 1× SG90 Micro Servo MotorPackage
Related products
-
Garnet Faceted Bead BraceletSelect options
This product has multiple variants. The options may be chosen on the product page
-
Garnet Triple Sterling Silver Ring; size 7Select options
This product has multiple variants. The options may be chosen on the product page
-
Garnet Tree of Life PendantSelect options
This product has multiple variants. The options may be chosen on the product page
-
Garnet Quadruple Faceted Sterling Silver PendantSelect options
This product has multiple variants. The options may be chosen on the product page